


-30%


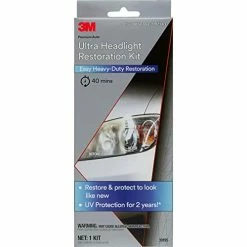


Discount ???? 3M Ultra Headlight Restoration Kit, Easy Heavy-Duty Restoration, 39195, 1 Kit ????
Original price was: $16.98.$11.89Current price is: $11.89.
- Fast, friendly, always here to help.
- Quality products, fair prices.
- fast shipping
- Secure Shopping with Safe Payments

3M Headlight Lens Restoration Kit is a collection of professional-grade products assembled specifically for removing the cloudy, yellowed haze that builds up on automotive headlight lenses. Kits use a system of light abrasives to keep vehicles looking great and save money vs. replacing expensive lenses. They include complete directions, 3M Trizact sanding discs, pads, tape and polishes.
- KIT INCLUDES – 1 – Disc Pad Holder, 3.25 in (8,2 cm) 6 – 3M Gold Sanding Discs 500 Grit, 3 in (7,6 cm) each 4 – 3M White Finishing Discs 800 Grit, 3 in (7,6 cm) each 1 – 3M Trizact Refining Disc 3000 Grit, 3 in (7,6 cm) 2 – 3M Quick Headlight Clear Co
- KITS CONTAIN masking tape, light sanding discs, wax protectant and more
- FOR USE ON plastic lenses � headlights, taillights, fog lights, directional lights and more
- 3M abrasive technology removes yellowing and buildup without damaging plastic lens surface
- Easy to use � choose a kit with no tools required, or for use with a common household drill
| Style | Heavy Duty, Ultra, Drill Required |
|---|
4 reviews for Discount ???? 3M Ultra Headlight Restoration Kit, Easy Heavy-Duty Restoration, 39195, 1 Kit ????
Add a review
Related products
-30%

Original price was: $89.99.$62.99Current price is: $62.99.
-30%

Original price was: $83.99.$58.79Current price is: $58.79.
-30%
![Cheap ???? [Upgraded 5] ASPL 48LED Roof Top Strobe Lights, High Visibility Emergency Safety Warning LED Mini Strobe Light Bar With Magnetic Base For 12-24V Snow Plow, Trucks, Construction Vehicles (Amber/White) ❤️](https://www.headlight-store.com/wp-content/uploads/2022/12/51Z5sWt3AIL-247x247.webp)
Original price was: $35.99.$25.19Current price is: $25.19.
-30%
Original price was: $39.99.$27.99Current price is: $27.99.
-30%

Original price was: $32.99.$23.09Current price is: $23.09.
-30%
Original price was: $19.99.$13.99Current price is: $13.99.
-30%

Original price was: $12.99.$9.09Current price is: $9.09.
-30%
Original price was: $39.99.$27.99Current price is: $27.99.
Annapolis76EB –
This is a great kit and the best value gong for headlight restoration. If you take your time and follow the instructions your headlights will look nearly brand new when you are done. I recently used this kit to polish an extremely yellowed and corroded set of headlights on a 2006 Volvo S60. As you can see from the pictures, the results speak for themselves. The instructions that come with the kit are quite good, but I will try to share my experience and tips for professional results. I recommend you also have painters tape, a spray bottle of water, and 2 microfiber towels for this procedure.The kit comes with a hook and loop backing plate that attaches to your drill, 6 pieces of 500 grit sandpaper, 4 pieces of 800 grit sandpaper, 1 3000 grit sanding disk, a polishing pad, and 3m rubbing compound. The first thing to do is tape off everything that is next to or in contact with your headlight lens. Next you should put your backing plate in your drill and stick the 500 grit sandpaper to the backing plate. I put my 18 volt Dewalt cordless drill on low speed for this step. You should sand your headlight with slight pressure going across the headlight lens in overlapping passes.Do not keep the drill in one place or you will sand an indention into your lens. When the sanding disk starts becoming ineffective you should swap it out with another 500 grit disk or blow the disc out with compressed air. You should sand until the lens is evenly sanded and there are no “shiny” or yellow spots showing (wipe your lens with a damp cloth frequently to check how you are doing). It is hard to explain, but when the lens is properly sanded at this stage, the whole lens should uniformly look frosted.Once you have the proper uniform frost on your lens (I used 2 discs per lens on this stage) wipe it down with your damp cloth and affix the 800 grit sandpaper disc to your backing plate. This step is where I have the slightest complaint with the kit. I really wish the kit included 6 800 grit discs instead of only four. It is really important that you take your time on this step to remove the scratches from the 500 grit sandpaper you just used. I started this step with my drill again on low, and just as you did with the first step, slowly and with light pressure sand across your lens in overlapping passes. When your disc starts becoming noneffective use compressed air to blow the build-up off of the disc. This is where an additional 2 discs of 800 grit would be nice. Continue sanding on low until this disc is no longer usable and then replace it with your second 800 grit disc. At this point I moved my drill to high to continue sanding with light, overlapping passes. Be careful when you have your drill on high. If your disc slips and hits the tape/paint it could burn a spot through the clear coat or even the base. Nothing to be scared of, but just be careful as it is harder to control on high. Really take your time on this step and sand until the 800 grit disc is unusable. You really want to make sure you get all of the deep sanding mark from the 500 grit disc out of the lens. Once you have sanded until all deep scratches are gone or your 800 grit disc is completely unusable, it is time for the 3000 grit wet sand.For this stage you should affix the 3000 grit disc (there is only one in the kit) to your backing plate and and grab your spray bottle of water. Lightly mist the 3000 grit disk with one spray of water and lightly mist the lens with 3-4 sprays. I used the high setting on my drill for this step. As you did with the previous steps, lightly sand across the headlight lens in overlapping patterns. Within about 30 seconds to a minute you should begin to see a white slur form on the lens. I recommend you sand the lens completely 2 times and then stop to wipe it off. After you wipe off the lens, mist the lens with 2-3 squirts of water and complete 2 more complete sands on the lens. Depending on your lens, it will probably take 6-10 full sands of the lens. When you think you are close, mist the lens with 2-3 coats of water, wipe it off, and make sure there are not really any scratches in the lens. The lens should be almost 100% smooth at this point. If your are happy with the lens it is time for the final step.Remove the 3000 grit disc and set it aside (do not discard as you will need this for the other lens). Attach the orange polishing pad to your backing plate and squeeze 3-4 small (smaller than a pee) dabs of the rubbing compound on various points of the pad. I then recommend you touch the pad/compound against your lens in 2-3 locations on your lens (this helps it apply evenly). You should then put your drill on low, and with light pressure. quickly but carefully spread the compound over the whole lens. Once the compound is spread across the lens somewhat evenly, turn your drill on high and with light to medium pressure (a little more than when you were using the sanding discs) make slow overlapping passes across the lens until compound goes almost clear. Add more compund and repeat until headlights are crystal clear or you run out of compound. I recommend you seal your headlights or they will begin to yellow again in a few months. I highly recommend Optimum Opti-Lens as your coating Opti-Lens Permanent Headlight Coating . This kit is expensive (approximately $50), but if you do not seal your headlights you will be doing this all over again in a matter of months to a year. The kit will also easily seal 6-8 sets of headlights.
Tony F –
I’ve read many of the reviews on here and I agree with some and others I don’t. I used an electric drill and had plenty of torque/RPMs. I performed this on a 2009 Honda Civic. The headlights on this model aren’t completely smooth which I think is what made this application more complex.I followed the instructions to a T and couldn’t get a consistent clearness on the headlights. Again, because the headlights aren’t completely smooth, the drill pads were getting torn up by the plastic grooves or whatever you want to call them that are a part of the mold of the headlight. It ended up being a royal pain for me. One headlight looks slightly better than the other because by the time I got to the second light, I had worn down the single 3000 grit Trizact pad which you only get one of in the kit.I’m going to try to purchase another 3M Trizact 3000 pad and finish off the second light. However, I shouldn’t have had to do this at this price point. I think they should have include 2 pads with the kit. Even if they did include 2, I’m still not impressed with the end result, even on the first light. I really don’t think a pro could have done a better job with this kit.The bottom line is that I don’t think the level of effort is worth the end result for this kit. It’s very difficult to determine how much pressure to apply and how much is enough. As you are sanding in the first 2 steps, you have to keep wiping off the dust and it’s almost impossible to tell if you’ve done enough. If your headlights are completely smooth, you might do ok.
Robert M. –
You can believe the before/after pictures others have posted. This stuff worked like a miracle. Here are some tips not mentioned in the instructions.1.DO NOT expect to see the crystal clear results UNTIL YOU REACH THE VERY LAST STEP. That is when you wipe off the rubbing compound. I was in disbelief how well it worked.2. Like the instructions say, sand more than you think is necessary at each step. You will have better results.3. Set aside about 2 hours total including going into the garage a few times to get stuff like recharging the batteries on your Roybi cordless drill you borrowed. I had to recharge twice.4. Don’t take any shortcuts, you are not smarter than the chemists at 3M (I am a chemist)5. Do what they say and apply at least 2 layers of tape and use the good stuff made from crepe.6. I did this outside in 55 degree weather and it did not cause trouble with the application of the clear protective liquid.7. If the INSIDE of the headlight has fogged up or has condensation, this stuff cannot help.
Fudman –
My daughter’s 2011 Honda CR-V had really yellowed headlamps. I used this kit based on the reviews. It worked GREAT! Instructions are simple and this took about 1 hour on the first headlamp and only 30 minutes on the second one. I found that you don’t need more than one sheet of each grit (you get (6) 500 & (4) 800 grit sheets) sandpaper per headlamp. That means you can do two cars with a single kit! Dry sanding with the 500 grit easily removed all the yellowed headlamp materials but left a significant haze on the surface. The 800 grit basically removed the haze left by the 500 grit and left a lighter haze. Wet sanding with the 3000 Trizact eliminates the finer haze completely and the polishing compound completes the job by polishing the surface. The headlamps look new!! I did this several years ago to my old BMW E39 using sheets of sandpaper and hand sanding. It took several hours for each headlamp! This system took just 90 minutes for two headlamps using a drill. The results are equal! They just need to add a packet of the Head Light Clear Coat protectant (39173) to the package for a complete solution.