

 ???? 2")
-30%
 ???? 3")
 ???? 4")
 ???? 5")
 ???? 6")
 ???? 7")
 ???? 8")

 ???? 9")
 ???? 10")
 ???? 11")
 ???? 12")
 ???? 13")
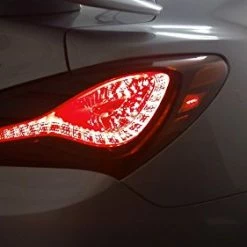
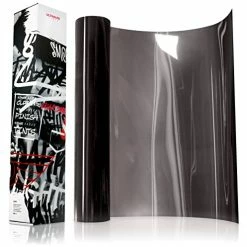
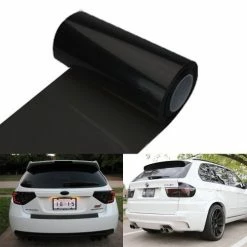
Cheapest ???? Air-Tint Dark Black Headlight Taillight Tint Air-Release Vinyl Wrap Film Roll (17.75in X 60in) ????
Original price was: $12.99.$9.09Current price is: $9.09.
- Fast, friendly, always here to help.
- Quality products, fair prices.
- fast shipping
- Secure Shopping with Safe Payments

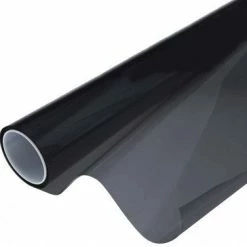
- Material: Vinyl
- Brand: VViViD
- Size: 17.75in x 60in
- Color: Black
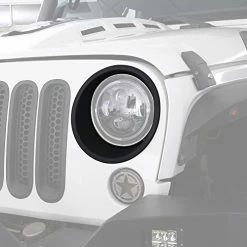
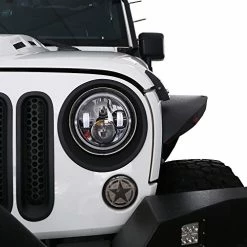
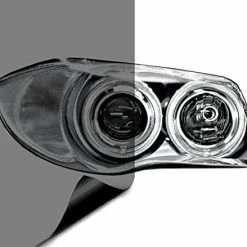
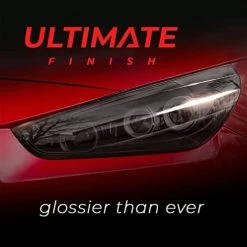
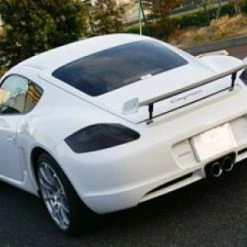
- VVIVID Air-Tints are an industry first: a headlight/taillight tint with all of the technologies developed in VVIVID+ premium materials. They include an air-release membrane which allows you to install the tint dry ( without installation liquid ) Ready to use out of the box!
- This is the only film on the market that can wrap ANY SHAPE. It is super conformable with heat. It was originally manufactured for hard-to-wrap surfaces, but the ease of install has professionals saving time on any headlight shape.
- This film is also self healing and scratches will go away with heat! Simply cut the vinyl to shape, and apply it to the surface. To make the vinyl conform to curves, simply heat with a heat gun or hair dryer, stretch and apply. Lastly, using a sharp blade, trim away excess from the headlight and you’re done! its literally that simple!
- Made with automotive grade cast vinyl, these tints are 80% tinted smoke or 20% VLT. The adhesive is acrylic based which will not eat through plastic like other tints on the market. It is 100% chemical safe, and will not eat through headlight coatings or damage your lights.
- NOTE: MAKE SURE TO MEASURE YOUR HEADLIGHT TINTS – THIS PRE-CUT SHEET IS 1.49ft x 60″
| Size | 15ft x 5ft ( Bulk Roll ), 17.75in x 60in, 60in x 60in |
|---|
8 reviews for Cheapest ???? Air-Tint Dark Black Headlight Taillight Tint Air-Release Vinyl Wrap Film Roll (17.75in X 60in) ????
Add a review
Related products
-30%
Original price was: $19.99.$13.99Current price is: $13.99.
-30%
Original price was: $18.99.$13.29Current price is: $13.29.
-30%
Original price was: $12.99.$9.09Current price is: $9.09.
-30%
Original price was: $18.99.$13.29Current price is: $13.29.
-30%
Original price was: $29.99.$20.99Current price is: $20.99.
-30%
Original price was: $20.99.$14.69Current price is: $14.69.
-30%
Original price was: $6.99.$4.89Current price is: $4.89.
-30%
Original price was: $17.99.$12.59Current price is: $12.59.
Jay Tee –
My 124 spider looked pretty great from all angles except for a strange backup/reverse light setup in the middle of the exhaust diffuser. It looked like an add-on based on a safety requirement in Italy or Europe. You just don’t see this lamp arrangement on most cars. The sister platform Mazda MX-5 doesn’t have this light. I thought that dark lens tint would do the job of blending this lens into the black diffuser. You can see the before and after pics here. My advice is to cut plenty of extra lens tint–maybe 5 to 6 inches–all around the shape you’re wrapping. That gives you plenty of material to handle while you’re placing the vinyl without having to touch the backing where it contacts your lens. I wore nitrile gloves to smooth the vinyl slowly from the middle of the lens out to the edge. The curved edges want to bunch up initially but you can just gently lift the material (by the extra edges you left) and continue to smooth out the vinyl. I’m in Las Vegas and it was pretty warm while I was applying the vinyl so the material wanted to conform where I wanted it to go, for the most part. I did use a heat gun, lightly, to get the last few edges smoothed out. Use a small Exacto knife–I used an inexpensive one with the snap-off blade tips–and take your time. You want to place the blade against the surrounding surface and follow the contour of that surface while you cut. Don’t cut with the blade straight down, but angle the blade out towards the surrounding surface so you leave as much vinyl as you can while still outlining the edge. You don’t need to make the cut in a continuous line. As a matter of fact, that makes it harder to do because you end up with your wrist at very odd angles and you can’t maintain the proper line. Just carefully make one cut and then get the proper angle again for the next cut and continue on. When you’re done, gently lift away the outside of the extra material. When you’ve fully peeled away the trimmed material you may have a tiny bit extra around the edge somewhere. Trust me, that’s way better than having cut away too much and seeing an exposed lens edge. You can simply tuck that material down with a soft-edged small tool–heating the vinyl gently will help get the material where you want it to go. If you left a bunch too much, carefully trim the edge and then tuck as before. Good luck and do take your time. –JT
cowdude –
I put this on the head lights and running lights in front of my 2006 silverado. I put it on the tail light lenses and it took about 2 hours to smooth it on the curved surfaces. After successfully doing that, I can only see the tail lights from 6ft away. I have bright LED bulbs in the tail lights so it should have been brighter. Even the white reverse lights were dim. I don’t blame vivvid, you just have to use a lighter tint for these tail lights. I wasted tint and 2 hours to find that out. My rear lenses are in bad shape is why I wanted to tint them. I just ordered a new pair of smoked ones. The front ones look good but I have bright LEDs in all of them so it kind of helps on coming drivers with the brightness. I don’t know how it does with halogen bulbs.
❤️ –
I had only ever wrapped a hood of a mustang before so this was new, but it was surprisingly easy to apply. There were a few bubbles that I got out with a razor. The vinyl is not too dark and my brake lights are still easily visible. All in all great product!
Kevin B. –
Very easy to install for a 1st timer. I messed up a few spots but it was me being new and not the film. I have used the wet applications before and had to trash them. This is very forgiving and using the heat you can really stretch this cleanly over any shape or curve. I was able to do both headlights, both fogs, and my mirror turn signals with one roll. Just ordered another roll for the taillights. The videos make it look easy but I found the trimming difficult but again I am inexperienced. Lights still shine good at night for oncoming traffic to see you but these are DARK and you will loose a lot of your light output you are used to so it will take some getting used to. I love this product and gave 5 stars. Excellent product, good price, forgiving film for a beginner. Watch some videos and you can do this! For a tip, use extra film like the videos say so you don’t put fingerprints in the film as this is not a wet apply film. Adding more pictures of the tailights and mirrors plus light output. Really hoping VViViD will send me a decal for my car or a banner for my garage, or both for my reviews lol ????
Nelson Contreras –
No enviaron el pedido completo como viene en la descripción. El producto excelente, lastima quien despacha
Jeffrey –
For $13 this is amazing, never wraped anything in my life and it still came out pretty well 10/10 def would recommend. Just dont rush it
Amazon Customer –
Nope.Look, I watched the instructional video more than once, several times in fact. The guy doing it is obviously a pro. I am not. First time trying this and it’s a no go for me. It was a pure headache. Does great on flat surfaces but curves and edges were horrible. Tore it all off this morning, I hated how it looked. The “black” was entirely too dark, but looked great with lights on. I tried this because in the past I’ve painted lights and thought this would be a wonderful way to avoid the steps and process of THAT operation. This looked decent from a distance, but up close it was absolutely horrible. I’m not saying it was the product, I’m sure it was mostly me. However, I was just not satisfied with it and will be painting here soon.I tried, but ultimately wasted money and time.
Adam Burnett –
Not that easy to work with for beginners, use heat but not too much or it’ll melt, long term adhesion has been questionable, random bubbles popping up on previously totally clean flat surfaces within 2 months. Gets the job done and looks way better than stock but could be a better product.