

-30%


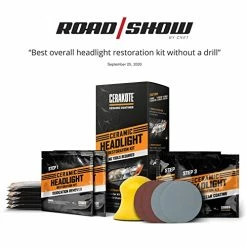


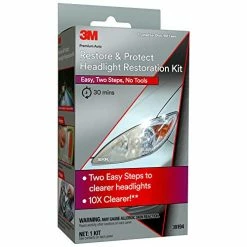
Best deal ⭐ Ceramic Headlight Restoration Kit – Guaranteed To Last As Long As You Own Your Vehicle – Brings Headlights Back To Like New Condition – 3 Easy Steps – No Power Tools Required ????
Original price was: $17.88.$12.52Current price is: $12.52.
- Fast, friendly, always here to help.
- Quality products, fair prices.
- fast shipping
- Secure Shopping with Safe Payments

- Brand: CERAKOTE
- Position: Front
- Lens Color: Clear
- Item Dimensions LxWxH: 4 x 3 x 8 inches
- GUARANTEED TO LAST AS LONG AS YOU OWN YOUR VEHICLE! – You read it right! We’re so confident in our CERAMIC coating that we’ll stand behind our limited lifetime warranty that it will last as long as you own your vehicle, or we’ll cover the next kit for free. Our chemists developed this kit IN HOUSE at Cerakote HQ. We aren’t re-bottling another company’s product. This is a CERAMIC coating that chemically bonds to your headlights and provides UV protection for as long as you’ll own your vehicle.
- NO POWER TOOLS REQUIRED – Everything is included in your kit. There are no tools required that could potentially damage your headlights or paint. There’s nothing worse than having to call your crazy uncle you haven’t seen since the holidays because he’s got the power tools you need. After he hollers “STAND CLEAR!!”, fires up his wheezing disk sander, runs it off of your headlight and across the paint on your hood.. It’s too late. DON’T BUY A KIT THAT REQUIRES TOOLS!
- RESTORES AND PROTECTS FROM UV! – This isn’t the classic bait-and-switch you’re used to. We won’t sell you something that needs to be purchased again in a few months. Our CERAMIC coating provides a layer of UV protection that is guaranteed to stand the test of time. We believe in providing our customers the best products on earth, the first time. After all, we’re the chemists that have been providing world-class ceramic coatings to endless industries for DECADES. It’s what we do.
- 3 EASY STEPS! – Cerakote’s Headlight Restoration Kit is a simple, 30 minute process. Step 1: You’ll be mesmerized by our Oxidation Remover as you wipe away the hazy surface oxidation. Step 2: Use our ergonomic surface prep pad to remove the deep oxidation and prep your headlight for the CERAMIC clear coating. Step 3: Cerakote’s pre-moistened Ceramic Headlight Restoration Wipes restore your headlights to a like-new condition that is backed by our limited lifetime warranty.
- WHY TRUST CERAKOTE? – Cerakote is regarded as the world’s leading innovator and manufacturer of true inorganic ceramic polymer technology. The ceramic polymers and coatings produced at Cerakote’s US facility are trusted by some of the most advanced aerospace, automotive and technology companies in the world. Rely on the industry leader to protect what matters to you.
| Size | 1 VEHICLE KIT, PRO PACK STEP 3 ONLY, PRO KIT |
|---|
2 reviews for Best deal ⭐ Ceramic Headlight Restoration Kit – Guaranteed To Last As Long As You Own Your Vehicle – Brings Headlights Back To Like New Condition – 3 Easy Steps – No Power Tools Required ????
Add a review
Related products
-30%
Original price was: $13.85.$9.70Current price is: $9.70.
-30%
Original price was: $16.99.$11.89Current price is: $11.89.
-30%
Original price was: $9.98.$6.99Current price is: $6.99.
-30%

Original price was: $20.99.$14.69Current price is: $14.69.
-30%
Original price was: $19.99.$13.99Current price is: $13.99.
-30%
Original price was: $11.99.$8.39Current price is: $8.39.
-30%
![Coupon ???? [4 Pack] LED Road Flares Safety Flashing Warning Light Roadside Emergency Disc Beacon Kit For Vehicles Boats With Magnetic Base & Hook, Premium Storage Bag (Batteries Not Included) (4) ????](https://www.headlight-store.com/wp-content/uploads/2022/12/51XxYwcRg2L-247x247.webp)
Original price was: $24.99.$17.49Current price is: $17.49.
-30%
Original price was: $19.99.$13.99Current price is: $13.99.
Clarice S. –
I have amazing results – like truly brand-new looking headlights on a 14 year old BMW X3 w/six-figure mileage. However, that wasn’t the case the first time around. Follow my advice – not just the instructions – and you will get the results you want.My first time around I followed the instructions to the letter. I was amazed at the oxidation that came off in step 1, and even made sure to use all four wipes even though they were clear by 3, because the instructions said so. Step 2 I kept running water trickling across the headlight the whole time, and spent a timed 4 minutes on each headlight at each grit. After applying step 3 I thought I had done an amazing job. Then it dried overnight. And it was hazy. You could see the horizontal sanding lines if you looked closely. It was way better than when I started, but nowhere near looking “like new”. Probably about 75-80% there.So I called the company and asked for warranty help. I got a voice mail and thought for sure I’d never hear back (I couldn’t find an email address or online form to complete). Sure enough, my phone rang about five hours later and a nice guy listened patiently, took my information, and said they’d overnight a new set of steps 2 and 3: sanding pads at both levels, and the ceramic coating. I asked if it would be a problem for me to spend more time, and even do my own polishing after their time limit and direction. He said to go for it. That was the trick.So, I did it again today. Skipping step 1, I started with the 2000 grit paper. Instead of trickling water, I sprayed the headlights after each maybe 30 seconds of sanding, and it was in the shade. I spent a solid 5 minutes at 2000 grit. Then I spent about 8 minutes using 3000 grit on each. This was important, as I found it was important to spend longer at the higher grit to really soften the surface. I had a very consistent and smooth-ish surface, but could still see sanding lines. I pulled out a bottle of clear plastic polish (maguiar’s #10). I used to use this stuff on a soft plastic convertible window maybe 15 years ago, but never threw away the bottle. I spent about five minutes on each headlight with this polish. I didn’t use anything really abrasive – just a cotton buffing rag, and some elbow grease. After this step, the headlights were looking 95% even before the ceramic coating.Then came step 3. It was again like magic. But this time, it stayed like magic. So, why 4 stars instead of 5 when this stuff works? Because it doesn’t work as well as it should with their instructions. You need to get it polished just a bit more to really get amazing results. Now I’m thrilled. It dried a couple hours, and then rain came I was worried, but it still looks awesome. I’ll update this review if something changes, but I’m a believer – with the right modifications!I have included three pictures of the driver side headlight to show you the differences. The picture from a little further away where the headlight is cloudy is before I did anything other than clean it. The picture a little closer where it looks pretty decent but not glass-like is after the first series of following the instructions. And finally the close-up where it looks like glass is after doing step two and step two plus my clear plastic polish, and then step three a final time. And that how it truly looks. Like glass. Love the result.
rocsgirl –
I tried to get the best possible pics as I was doing this project. It took me about 2 hours to complete, but, I’m a perfectionist and stopped a few times to get more water, etc.. If you have done this before it probably would not take that much time. Anyways, this stuff is the bomb, don’t hesitate to purchase it, if you can clean a window you can do this.The company has made this super user friendly. I used my phone and watched the video on you tube that comes in code with the instructions. Basically, I added a few more steps that I feel are very IMPORTANT. I used painters tape around the painted and chromed areas, basically anything that was near the headlight I taped off. Spend the extra time doing this step as YOU WILL touch your paint with at least one of the products and it literally takes only a few extra minutes to do.Okay, so I would have a bag of rags at the ready, a clean spray bottle filled with filtered water (only because you’re taking off oxidation and yuck, don’t add bad water from the hose back on) Painters tape, they give you two sets of vinyl gloves, take all the products out of the box and put in order of use. Then you’re ready. If you follow the instructions, watch the video, set up your supplies as needed you will have great results.I taped the lights off for the 1st application and the sanding part, then I rinsed the lights off with the spray bottle and towel and then removed the tape. I made sure the lights and surrounding areas were COMPLETELY DRIED and then I retaped with the painters tape before the last step to ensure nothing got on the paint. Trust me take the steps in doing this as you will touch your paint with either the chemical or sanding at some point if you don’t.I started at 5pm, then turned the car around facing inside the garage so the sun wasn’t beating on the car and finished at 7pm. I always park in the garage so it stayed in all night and this morning I took the last pics without the tape on.I have a 2015 Honda Accord and as you can see in the pics it’s like I bought brand new headlights!!!Thank you Cerakote!!!!