
 ❤️ 1")

 ???? 3")
 ???? 4")
 ???? 5")
 ???? 6")
 ???? 7")
 ???? 8")
 ???? 9")
 ???? 10")
 ???? 11")
 ???? 12")
 ???? 13")
 ???? 14")
 ???? 15")
 ???? 16")
 ???? 17")
 ???? 18")
 ???? 19")
 ???? 20")
 ???? 21")
 ???? 22")
 ???? 23")
 ???? 24")
 ???? 25")
 ???? 26")
 ???? 27")
 ???? 28")
 ???? 29")
 ???? 30")
 ???? 31")
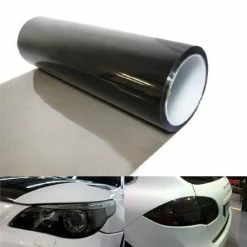
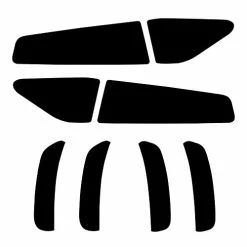
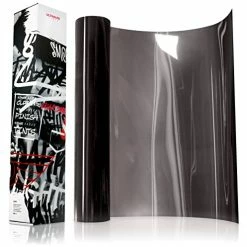
Outlet ???? DIYAH 12 X 48 Inches Self Adhesive Headlight, Tail Lights, Fog Lights Tint Vinyl Film (Light Black) ????
Original price was: $6.99.$4.89Current price is: $4.89.
- Fast, friendly, always here to help.
- Quality products, fair prices.
- fast shipping
- Secure Shopping with Safe Payments

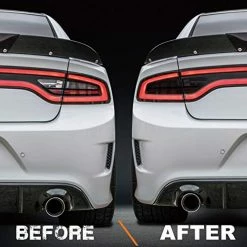
Why is headlight protection so valuable ? It has been estimated that on average 1 out of every 6 automobiles will require headlight replacement due to damage from road debris. Replacing headlight components can be an expensive and time consuming process, the average headlamp set costs $450 to replace. Plastic headlights tend to dull and lose their transparency, glass headlights tend to break and fracture as they wear. what tools do I need for install headlight tint? Vinyl Squeegee (Credit Card /w cloth wrap will work) Soft Cloth Towel Spray Bottle with soapy water Hair Dryer or a Heat Gun How to Install Headlight and Tail Light Tint film? 1. Clean the surface of the Headlight or Tail light with soap and water to ensure all debris are removed from the surface of the Tail Light. 2. Carefully remove the Overlay from the sheet and spray the overlay’s adhesive side with Soap and Water. The Soap and Water will prevent the Overlay’s adhesive from sticking while you apply it the Tail Light. 3. Carefully apply/align the Overlay on the Tail Light and smooth out as much crease as possible by using your fingers. Use the vinyl squeegee to push out all the soapy water on the front face of the Tail Light. The more soapy water you push out the less bubbling there will be. Note: Make sure the crease are evenly distributed on the Overlay, therefore you can easily smooth it out with a heat Gun and Squeegee. 4. Carefully pull and fold the side inward. If necessary, use the hair dryer to soften up the vinyl and squeegee out all the crease. 5. Heat up the excess vinyl (heating up the vinyl will soften it and makes it easy to trim) and trim. Note: Don’t worry if you over stretch the vinyl. Any excess vinyl protruding can be easily removed using a knife.
- 1 piece 12 by 48 inches
- Self-adhesive, peel and stick
- Stretchable with heat and water resistant
- Easily cleansed with water and easy to remove without residual
| Color | Orange, Purple, Pink, Green, Clear, Dark Blue, Light Blue, Dark Black, Golden, Light Black |
|---|
6 reviews for Outlet ???? DIYAH 12 X 48 Inches Self Adhesive Headlight, Tail Lights, Fog Lights Tint Vinyl Film (Light Black) ????
Add a review
Related products


lance –
My first time using this wrap so bear with me on the review. This stuff is nice. Very clear and easy to install. Covering lights is not as easy as I hoped it might be and I ended up with mine not covered at all. For me the turn of the light..it’s curves…were much harder for me to work out….I would say it’s probably a heat gun if you have one but I’m not experienced at this at all so I just gave it my best shot in short and then let it be. It’s worth practice as it costs at estimate $250-$375 to have my head and tail lights covered and if you buy 5-6 rolls of this wrap and use your old lights to practice on first I gaurantee you’ll be able to wrap head lights and tail lights exactly like the shops. I say that because it’s true but the keys to custom and professional and shop jobs is that they want to find a key way to lock customers in to thier service. That’s unfortunate because it adds confusion to the diy consumer who wants to be able to do a good job and protect thier investment and secure thier own interests as well. The industry literally goes out of thier way to effect consumers and prevent them from making progress and process easily without swallowing thier bottom lip and often thier bottom line for cost. It’s just me? No..there’s a method behind the diy community that unravels as you work and it’s one that’s brotherly and fatherly and fraternal….timing in to make you practice and eventually join the industry or be seen as disrespectful or a lone wolf. This applies to mechanics tattooist’s artists musicians wrappers painters and customizers of all kinds. Don’t even get into martial arts! You’ll find you’re automatically a kung fool!!! But anyways this wrap is nice. It’s what you’d wanna buy to practice wrapping lights and it’s thick..its not thin…it’s not tint…it’s a protective film wrap…buy it try it don’t deny it…you can learn with this film and you’ll just need some old lights to practice. The curves are all that’s hard and with a squeegee and some heat you should be able to get that worked out. It’s nice stuff.
Kristoffir –
I bought this to use as a color tint for my wife’s mandalorian helmet visor. I used silver one-way mirror film on one side of the visor for the mirror effect, and this ‘purple’ film on the front for tint. It worked really nicely, though this really becomes a pinkish purple with only one layer. Maybe a second layer would have made it more purple.To apply, make a mixture of dish soap and water, coat the part this film will be applied to with a lot of soapy water. Make sure the part does not dry out at all while applying this film, or you won’t be able to get the bubbles out. If you do this properly with a lot of soapy water, the bubbles will easily squeegee out, and you’ll be left with a perfect finish.Spend the money to get a squeegee meant for this purpose (softer plastic/rubber). If you use a credit card or similar object as a squeegee, you will scratch this soft film.I’ll post another pic when I finish the helmet.
Valentine Michael Smith –
The Large rear tail light area got 90% broken out and this film allowed me to easily cover the majority of the area in One Large piece instead of dozens of strips of the narrow tape-type products. The product was easy to install once I was able to separate the clear films over BOTH sides of the product I think the folks who said it wasn’t adhesive failed to remove the clear film from the adhesive side before trying to use it. I think the product is a great value and highly recommend it.
Amazon Customer –
Like it
Frankie G. –
Great for small projects wish I didn’t leave it in the car got hot and wrinkled up like crazy
Wedway –
I’m updating my review and rating. Originally thought the film was not working properly. What I discovered (and found out is mentioned in a handful of reviews) is that there are “two” protective layers to be removed. That detail is not mentioned in the instructions provide on the Amazon ad page (there are no instructions included with the product). I believe my first experience failed because I didn’t remove the “outer” film after installation. Found the following video which highlighted this for me (Note: this was a link on the ad page when viewed using the Amazon app, but does not appear on web page version):https://www.amazon.com/vdp/7cb4501e781b4b5eb51939a54b4a1c87Once I reapplied the film, and removed the outer protective layer after smoothing, it has stayed in place like it should. So changing my rating from 3 stars to 5 stars.**********Original ReviewInstalled this filter on the lens of a flat led light to reduce color temperature. Had high hopes this would work. But because the film is so tightly rolled when it arrives, it never relaxed and eventually uncurled right off the light. Maybe the adhesion on my particular roll was old and didn’t have the strength it should have but unfortunately it was disappointing. Maybe others have had better luck. Can’t recommend based on my experience and application.