


-30%


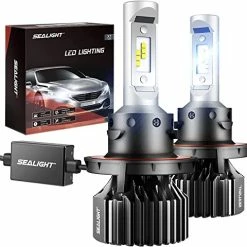


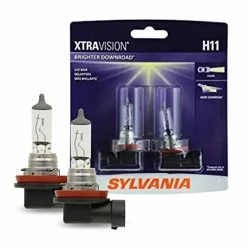
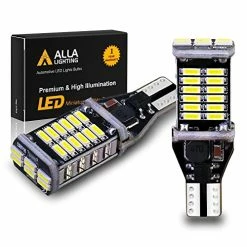
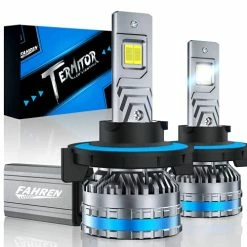
Brand new ???? H13/9008 LED Bulbs, Dual Hi/Lo Beam LED Bulbs, Super Bright Cool White Plug And Play, Quick Installation Halogen Replacement, Pack Of 2 ????
Original price was: $39.99.$27.99Current price is: $27.99.
- Fast, friendly, always here to help.
- Quality products, fair prices.
- fast shipping
- Secure Shopping with Safe Payments

- Brand: SEALIGHT
- Light Source Type: LED
- Color Temperature: 6000 Kelvin
- Wattage: 100.00
- Item Package Quantity: 1
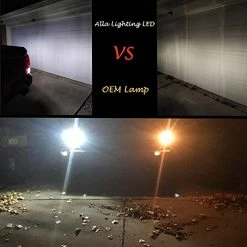
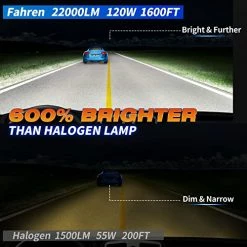
- Better Visibility: SEALIGHT H13 LED bulbs have better visibility, 6000K eye-protection xenon white. 1:1 halogen focus beam pattern
- 10 Minutes Easy Installation: No need to tools and break anything, true plug and play. Warm tip: we are upgrading our packaging and you may receive one of two boxes randomly
- Over 50,000 Hours Lifespan: H13 LED bulbs has been rigorously tested for durability. Whole aviation aluminum body, unique hollow carved heat sink design. Ensures a longer lifespan
- Compact Fanless Design: The latest non-integrated fanless design is compact and silent, utilizes an advanced heat sink measuring just 1.16 inches, and features a driver for increased performance
- Sealight H13 9008 LED bulbs can fit 99% vehicles without CANbus adapter: but for some vehicles, computer system may be sensitive and send error message for any aftermarket bulbs. To solve the issue, an additional CANbus Decoder is needed to make the bulb perform well. Please contact us with Amazon Buyer Message to get help and solutions
| Model | 9005, 9006, 9007, H13 |
|---|
7 reviews for Brand new ???? H13/9008 LED Bulbs, Dual Hi/Lo Beam LED Bulbs, Super Bright Cool White Plug And Play, Quick Installation Halogen Replacement, Pack Of 2 ????
Add a review
Related products
-30%

Original price was: $69.99.$48.99Current price is: $48.99.
-30%

Original price was: $39.99.$27.99Current price is: $27.99.
-30%

Original price was: $29.99.$20.99Current price is: $20.99.
-30%
Original price was: $23.75.$16.63Current price is: $16.63.
-30%
Original price was: $14.39.$10.07Current price is: $10.07.
-30%
Original price was: $10.38.$7.27Current price is: $7.27.
-30%
Original price was: $59.99.$41.99Current price is: $41.99.
-30%
Original price was: $79.99.$55.99Current price is: $55.99.
Mike –
The lights work great and look great once installed. It is not technically hard to replace the factory OEM lights with these LED lights. I wish I had made a video to share on YouTube because there are none in good detail to show or explain the process, but I did not make one. So, I’ll try to give an explanation of it… for someone with small hands, this task would be quick and easy for the Nissan Juke, but for someone like myself who wears at least a size X-Large gloves it was not easy to get my hands into the very tight spaces for changing the lights. And, I was only able to get 2 to 3 fingers through the housing holes to reach the lights, but I managed to complete the task. The task is the same for both the dim and the bright lights… You do not have to remove any parts of the front end (bumper, grill, ECT) like you do on some vehicle types and you do not have to remove the headlight housing. As you look under the hood, look down to where you will see the back of the plastic headlight housing. There you will see two large rubber caps which are about 3″ diameter each. The dim light will be the rubber cap which is the higher one and directly behind where that dim light is positioned in the headlight housing. The rubber cap for the bright light will be a hair lower and angled towards the engine. Each rubber cap pulls off of the housing easily and will easily push back onto the housing once you are finished. The dim light is easier to reach than the bright light due to the tight space and the angle of the housing hole for the bright light. So, I started with the easy one (dim light) first. Reach inside the headlight housing hole and you will feel the wiring harness for the light. Do NOT pull on the wires! Connected to those wires you will feel the back of the light. Leave the wiring harness connected for now. The wires will pull out with the bulb once you pull it from the housing. Grip the back of the light bulb firmly with your fingers and twist counter-clockwise about 1/4 turn. Do NOT pull or push on the back of the light bulb at an angle! Twist it evenly and you will feel the light loosen from its locked position. Once it is lose, guide it out of its position straight back towards the back of the car. Once it is completely out of it’s position, then you can easily pull the light bulb out of the housing with the wires still attached. The wiring harness is short, so you will have to hold it close to the housing hole. Now you will look at the wire connection of the bulb. You will see a small tab which you will press as you easily pull the wire connection from the bulb. If it does not separate easily, then you are not pressing the tab enough to release it from the locking notch on the bulb. Once you have disconnected the old bulb, set the bulb aside and do NOT let the wiring harness fall back into the housing. If the wiring harness falls back into the housing, you may have a heck of a time getting it back out again as it may be hard to reach without the aid of a small claw grabbing tool which I keep in my tool box. Now to connect the LED light, avoid touching the several tiny LEDs. The LED light will connect only one way, so you won’t get it wrong. Align the small locking notch on the light wire with the locking tab on the wiring harness and slide them together until the tab clicks as it locks onto the small notch. Before you put the new light into the headlight housing turn on the headlights for only a few seconds to make sure the new LED light is working properly. If working, turn off headlights and insert the new light into the housing the exact opposite of what you did when removing the old light. As you insert the light into the housing also guide wiring harness and light wire into the housing, but be careful not to let the wires get into the hole of the light’s position hole. Again, be careful to not touch the small LEDs AND be careful to not scrape the small LEDs against anything as you’re inserting the LED light into the housing or into it’s position hole. Once you have the light inside the housing and inserting it into it’s locking position hole, make sure that you properly lineup the locking notches (notice that one of the 3 notches is smaller than the other 2) of the light with the notch slots of the light position inside the housing. Once you are sure it is lined up properly and is straight, firmly push the light straight into it’s position (towards the front of the car) even further as you twist it clockwise to lock the light into it’s position. MAKE SURE that you do NOT push the light at an angle as you’re trying to lock it in! Once the light is properly secured into it’s position try giving it a gentle wiggle and pull to make for sure that it is locked into it’s position properly. Now turn the headlights on again for another quick check to make sure the new light is still working. If all is good, make sure all of the wiring is inside the housing as it will just rest there inside the housing. You can now press the rubber cap securely back onto the hole at the back of the housing. This process is the same for dim and bright lights on both left and right sides. If you are replacing both the dim and the bright lights, you will notice they are designed differently, so make sure you’re using the correct type when installing the new light. There is no left or right bulb. If you’re changing out the bright lights, when you turn on the headlights to test them, make sure your brights are actually turned on to the bright headlights position on the driver’s controls. Good luck and remember that when changing the bright light, it will be more difficult than the dim light (mainly when trying lock in the light into it’s position), but it can be done. To aid you in this task you might need a small mirror which you can adjust the angle and a flashlight, so that if need be you can shine the light onto the mirror as you look into the housing to see what you’re trying to do, but you will not be able to look with the mirror at the same time your hand or fingers is/are reaching into the housing hole.
A.J. –
I got them for my Civic Sedan 2015.The installation was easy, same as with regular bulbs, the little box with the electronic components was also easy to affix. I liked that the LEDs elements get aligned in the 3-9 position with the lamp housing once the LED light is locked in the housing. So far I can say they do the job, they illuminate well, good they don’t have any fan for cooling, their construction and materials look and feel sturdy and durable, I do expected them to be brighter, according with its description in Amazon, however considering the price I paid (less than $30.00) they are OK and do the job, as seen on the picture. Longevity? I gotta wait and see, they are just few months old.
Syed Ali –
The fitting is simple and easy. Lights are definitely better than the stock. No questions about that. However, if you are looking at light performance at par with modern cars with led lights, then you need to install projector lenses, if at all the existing headlight assembly allows it. I doubt that seriously.Better alternative would be to go in for a new assembly. In the case of xterra, that means removing the bumper, which I am unwilling to do.All in all, it’s a decent product. I cannot comment at the longevity at this time.
justin koppman –
Bought these for my truck 2-3 years ago and they are great, so much so I just bought a set for my wife’s Suburban. I drive 20 miles to work in the dark and these lights combined with the Sealight led fog lights light up the road and ditches great. Ease of install depends on the vehicle, my truck was super easy, 2 pins per headlight and out they came, the Suburban was a little more difficult, had to take inner wheel well off and part of the bumper to access the light assembly. But as far as the lights themselves, it’s as easy as plugging them in and your set.
kbsparks –
I have installed a number of LED light systems on a variety of different cars and trucks in the past. These were particularly tricky to install on my 2019 Ram 1500 Classic. I had to remove the grill and both headlamp modules completely. This is not the fault of the lights, but any buyer should be aware of this. Further, the LED light instructions say to attempt to position the LED lights themselves horizontally in the sockets. I attempted to do this but it just cannot be done. I believe this results in a very spotty or splotchy light pattern from these bulbs. Again, not the fault of the bulb manufacturer, but a fact nonetheless.In sum, like other LED headlamps, these are extremely bright. The light they give off is very white and does not have that hokey blue look. But they are not perfect. I would buy them again because the distance the light throws and the width that the light throws are both excellent.One final note. These bulbs would not normally fit a 2019 Ram 1500 classic. It looks like the previous owner installed headlamp housings from a much earlier Ram. That is why these fit my truck and would not fit other 2019 Rams.
PAUL C. –
When I first received and installed the led bulbs in my 2005 Dodge Ram I noticed right away how bright they were. But I was getting a lamp out dash indicator. And when I switched from low beam to high beam, the lamp out indicator would go off but there was quite a long delay between switching to high beams. Like…total darkness for a long moment.I contacted the company’s support email and told them what was happening and my vehicle specs and gave them my Amazon order number. They promptly sent me an adapter that plugged inline and resolved all of my issues. Now they work perfectly.I’d recommend them.
Tool Man –
A bit of a pain to install. Make sure you get the resistor harness or your vehicle may not recognize them. Kept getting a lamp out error. Figuring out which way they go in is by trial and error, at first the brights were on when the indicator on the dash said the were off. Had to turn them over to get them right.