


-30%


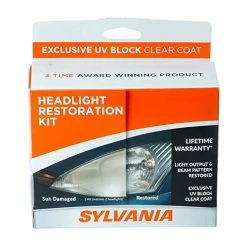


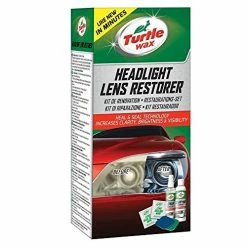
Discount ???? SYLVANIA – Headlight Restoration Kit – 3 Easy Steps To Restore Sun Damaged Headlights With Exclusive UV Block Clear ???? Coat, Light Output And Beam Pattern Restored, Long Lasting Protection ????
Original price was: $19.49.$13.64Current price is: $13.64.
- Fast, friendly, always here to help.
- Quality products, fair prices.
- fast shipping
- Secure Shopping with Safe Payments

- Restores Headlight To A Like-New Appearance and Removes Haze: Headlight lenses on your vehicle can become yellow, dull, and hazy from the sun. Our Headlight Restoration Kit fully removes haze and corrosion and restores the clarity and shine you need to see downroad at night.
- Restores Headlight Light Output: Restores original clarity and vision to sun damaged plastic headlight lenses. The lenses will be clearer, the headlight will shine brighter, and the road ahead will be better illuminated.
- 3 Easy Steps To Restore Long Lasting Uv Protection To Your Headlights: Step 1 – Surface Activator, Proprietary activator softens plastic, making it easier to sand smooth. Step 2 – Sand and Polish. Step 3 – Finish and seal with UV Block Clear Coat applicator.
- Lifetime Warranty: The components of this kit are good for two headlight assemblies. Once installed properly, the performance of the Sylvania Headlight Restoration Kit is guaranteed by a Lifetime Warranty for as long as you own your car.
- The Sylvania Standard Of Quality: With over 100 years in business, Sylvania is the world leader in automotive lighting for Original Equipment Manufacturers (OEMs) and the aftermarket.
| Style | Complete Kit, UV Block and Activator Only |
|---|
3 reviews for Discount ???? SYLVANIA – Headlight Restoration Kit – 3 Easy Steps To Restore Sun Damaged Headlights With Exclusive UV Block Clear ???? Coat, Light Output And Beam Pattern Restored, Long Lasting Protection ????
Add a review
Related products
-30%
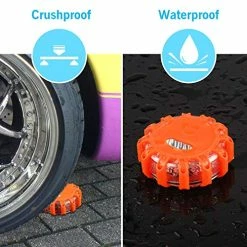
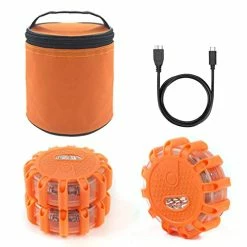
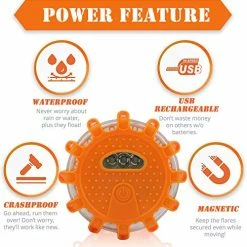
![Coupon ???? [4 Pack] LED Road Flares Safety Flashing Warning Light Roadside Emergency Disc Beacon Kit For Vehicles Boats With Magnetic Base & Hook, Premium Storage Bag (Batteries Not Included) (4) ????](https://www.headlight-store.com/wp-content/uploads/2022/12/51XxYwcRg2L-247x247.webp)
Original price was: $24.99.$17.49Current price is: $17.49.
-30%
Original price was: $9.98.$6.99Current price is: $6.99.
-30%
Original price was: $17.88.$12.52Current price is: $12.52.
-30%
Original price was: $39.99.$27.99Current price is: $27.99.
-30%

Original price was: $12.99.$9.09Current price is: $9.09.
-30%
Original price was: $24.99.$17.49Current price is: $17.49.
-30%
Original price was: $19.99.$13.99Current price is: $13.99.
-30%

Original price was: $20.99.$14.69Current price is: $14.69.
Jay Octavarium –
My headlights most likely weren’t near as bad as those belonging to the average person considering this project. I don’t live on the East Coast, where my car would be subjected to extreme humidity, salty air, and harsh Winters (though we do live near the beach)- and the car was primarily garaged for the second half of it’s life before I purchased it. But the passenger’s side headlight was covered in strange splotchy patches of buildup and the driver’s side was considerably fogged over. It was clear at one point in it’s life the car had received primarily direct sun to the driver’s side.This is a bit more involved than just wiping away the years from your headlights- But it does include everything you need (no extra tools required) and will take the average DIYer about an hour to complete both headlights. Keep in mind that, while anyone can do this project, your results will vary depending on how strictly you follow the instructions and if you have an previous experience with restoration or wet sanding. Yes, I said sanding.+ I suggest you also have on hand before starting- painters tape, lots of shop rags, a bowl of water and a bucket of water, an extra glove, a face mask, a marker to label the back of your sandpaper halves, and something to sit on.+ Work in a well aerated area, in the shade- away from any natural or artificial wind.Begin by taping off the liner and paint immediately surrounding your headlight with a durable painter’s tape. The kit claims that the materials used will not harm paint- but the instructions suggest taping- and I certainly would for 2 reasons: 1.) We noticed the first solution we used took the color off our shop rags, so it seemed to have some sort of acid or bleach in it, 2.) You will eventually be sanding right up against your car’s paint- not point in risking anything there. You will also want to start with a clean car.Next, treat the headlight surface with the Step 1 Activator, generously spraying, and allow it to sit about 30 seconds before washing away. Here’s what we noticed about this process- 1.) The spray is very aromatic in a chemical sense- you will need to step back for air, and you should always be working in an open, well aerated, shady area. I highly suggest wearing a simple paper face mask to help diffuse fumes, and that you keep your face as far back from the solution/mist as possible. 2.) You will be using this bottle a total of 4 times, 2 treatments each headlight, so you should expect to use about 1/4 of the bottle each time. 3.) Given the nature of the product and spray we suggest you wear gloves and wipe the solution off with a wet rag to clean the lens before continuing- rather than use a hose which may send the solution flying onto your car and other surfaces.Once the Activator solution has been cleaned off the lens, and the lens has been dried, it will quickly begin to cloud. This is normal and you will see this after every step from here until the final UV coat.Now you’re ready to begin sanding- the kit includes 3 sheets, 1 each of 2000, 1000, and 400 grit wet sanding paper. You should tear them in half and make note of which is which with a written indicator on the back since you will be using half a sheet for each lensMy father and I had some disagreement as to whether a mask should be worn through the sanding process- since this is a wet sanding procedure. I am going to suggest you do since we did see quite a bit of kickback debris on clothing and even in his ear after the sanding process.To wet sand you will want a small bowl of clean water nearby, and a clean cloth (to wipe up any drips that may make their way onto your car’s paint. Wet the lens with the wet cloth, and submerge the sanding paper into the water. Begin sanding (you’ll start with the 400 grit for the first step) in circular motions from the top corner of the headlight inward. You should expect to continue sanding for approximately 5 minutes- though cars with less build up may require less time. You will be able to tell you are done when the headlight has reached a uniform, smooth, texture, and there are no clear sections visible.Rinse your headlight and continue with the repeating the above process of sanding, using the 1000 grit sandpaper. Sand in circular motions with a wet lens and sandpaper for approximately 5 minutes, clean, then repeat with the 2000 grit. When you are done sanding you should have a clean, dry, foggy lens.Next you will apply the Clarifying Compound, which we closely attribute to a sort of buffing wax. Wet your lens with a clean wet rag and apply half of the compound to the provided white towel. Starting at the lower corner of the headlight, in sweeping circular motions, buff the clarifying compound into the lens for approximately 5 minutes.We were worried this compound would dry out during a 5 minute buff, but it actually seemed to break down and glide even more the longer we worked it into the lens. Once you are done clean and dry the lens. You will begin to notice the lens will maintain a glossy ‘wet’ look as though it is holding water along the surface.Now you’ll treat with the activator once more- spraying evenly, approximately 1/4 of the original bottle fill. Allow the solution to sit on the surface of the lens for 30 seconds then clean thoroughly and dry. It’s important after this step that you remove the tape, and any residue, and dry the lens, and surrounding rubber gasket. The lend and surrounding surfaces should be entirely dry before moving on to the final step.It’s important to note that all of the steps up to this point should be completed on BOTH headlights before moving onto the final step as to ensure one headlight is not disturbed while curing, etc.You’re provided one glove for the final step, the UV treatment- both of us agree you’ll want 2 gloves if possible. This UV Block Clear Coat sets really quick and feels like superglue nail polish as it tacks to your skin- be sure to avoid contact with your fingers, and have a damp, clean, rag on hand to wipe up any drips that might get into your car’s paint surface.For this final step you really can’t ‘go back’ and add a second layer, or adjust it after the fact. The UV coat dries rapidly, so you’ll want to try and get as much of the solution onto the provided shammy as possible so you can really drench the lens and apply in as minimal strokes as possible. Going back and ‘swiping’ through after even 30 seconds can leave tacky streaks and impurities in the final coating. It’s also important to note you will not want to drive your car, or touch the headlights for a minimum of 4-6 hours- the surface of my headlights was still ‘tacky’ at around 4, so I suggest going the full 6.Throughout this process you really don’t have a proper idea of the final impact until that last UV treatment reveal- it truly does instantly clarify. I’ll admit, the thought of sanding my headlights to make them clearer was initially unnerving, but it really makes a lot of sense! There’s no arguing my headlights look practically new to the naked eye, and the kit’s manufacturer guarantees the new UV coating will last the life of my car. Even better I’ve gained over double the visibility at night, which was a huge safety concern before! I would definitely do this again on other vehicles, and recommend it to friends and family!
Chris C. –
I’m not going to go over how to complete the process. There are plenty of YouTube videos about that. I will tell you how to achieve even better results if you have the patience and tools. If you can…1) Buy extra sandpaper in intermediate grits. The kit comes with 400, 1000, and 2000 grit. For really good results, add 600 and 3000 grit.2) Get yourself a large (at least 32oz) spray bottle or even better a handheld pump sprayer. You’re going to be spraying a lot of water during the wet sanding and cleaning process so get something that holds enough so you don’t have to refill your bottle.3) Get a microfiber foam applicator pad for applying the clear coat. If you don’t want to buy one, take any clean microfiber towel, cut it into quarters, and wrap a piece around a piece of foam.4) If you have a power drill, get a polishing pad attachment for it.Here are my tips during application:1) The instructions say apply firm pressure while wet sanding. Don’t do this. Just apply “the weight of your hand” level pressure. Let the sand paper do the work for you. Clean the sandpaper AND the headlight surface with water frequently. It might double the amount of time (10 minutes per grit vs 5 per the instructions) to achieve perfect glass smoothness, but it will guarantee you won’t leave any gouges in the surface, especially with the added 600 and 3000 grit sandpaper if you have it.2) Apply the step 2 polishing compound with a power drill and foam polishing pad. The compound is a mild abrasive that is meant to remove fine surface scratches from the fine grit sandpaper. The drill and polishing pad leaves you with an almost perfectly smooth surface. After this step, the headlight will be less foggy than if done by hand.3) Do not skimp on the clear coat. It has to be applied THICK in order to self level properly giving you the best results. Use a microfiber foam applicator pad if you have one. It holds plenty of product for a nice, even application. You also get 1 pass at proper application. If you are able to do it without having to touch up spots, the better your results will be. If you screw it up, don’t worry, you just have to wait until the clear coat cures fully then sand it off and reapply. The little 1oz bottle is also plenty for multiple cars. I did 2 cars and still have half a bottle left of clear coat.Overall, I’m stunned how well this product worked. Time will tell how long it lasts for but it’s inexpensive so even if it only lasts a year or 2, it’s easy enough and cheap enough to buy again.
Charles Valenzuela –
Directions were very clear and the video was perfect to make sure I was understanding the directions correctly. You will want a spray bottle of water to keep everything wet while you work, and you will need to re-fill a 1 qt spray bottle with water at least three times for each headlight. It actually took me about one hour to do each headlight and the results aare even better than I had hoped for. As you can see in the photos, my 15 year old Volvo headlamps were pretty scratched and degraded. New ones (HIDs) are about $700 each, so this was certainly worth a try at 20 bucks. They look like new, and there was sufficient stuff in the kit to finish both lights. TIP: The final clear coat was a little sloppy to put on the supplied pad and I made a mistake by not wearing a second glove on my non-applying hand. One glove comes with the kit, but you don’t want that sticky stuff on your pouring hand. Very pleased. I don’t know yet how long the headlights will look this good, but you can’t beat the price. I’ll be happy if I don’t need to repeat the process for a year, and very happy if it lasts for 4 years.