

 ???? 2")
-30%


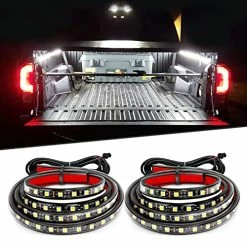
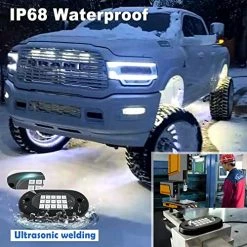
Deals ???? TR-08 8PCS 24LED Rock Light For Cargo Truck Pickup Bed Off Road Under Car Side Marker LED Rock Lighting Kit W/Switch White, 2 Years Warranty ????
Original price was: $14.89.$10.42Current price is: $10.42.
- Fast, friendly, always here to help.
- Quality products, fair prices.
- fast shipping
- Secure Shopping with Safe Payments

- Brand: Nilight
- Color: White
- Vehicle Service Type: Passenger Car, Truck
- Voltage: 12 Volts
- Light Source Type: LED
- Position: Bottom
- Cover Included: 24LEDs LED Rock Light
- Fit Type: Universal Fit
- Water Resistance Level: Waterproof
- Remote Control Included?: No
- Features: Total of 8 Lighting Pods housing a total of 24 Ultra-Bright SMD 2835 LEDs. It is bright enough to allow you to work after dark without having to hold a flashlight or plug in a portable work light
- Practical Design: Each pod equipped a plug, plug between each unit allows flexibility for custom install. You can adjust the pod length you need freely
- Durable & Weatherproof: Waterproof Rate: IP67, design to withstand harsh weather conditions. (Rain, Snow, etc.)
- Easy to Install: The reliable tape can be quickly installed and can be fixed with screws to be more secure; In addition, each strand with a switch, so you can freely control your LED lighting pods, has 21 feet of wire per strand (4 pods per strand), 2 feet of wire between each pod
- PACKAGE INCLUDES: 1x 8pcs 24 LEDs Cargo Truck Bed Rail Light, Side Marker LED Lighting Kit
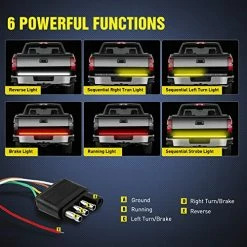
| Color | Blue, Green, Red, White |
|---|
8 reviews for Deals ???? TR-08 8PCS 24LED Rock Light For Cargo Truck Pickup Bed Off Road Under Car Side Marker LED Rock Lighting Kit W/Switch White, 2 Years Warranty ????
Add a review
Related products
-30%

Original price was: $22.27.$15.59Current price is: $15.59.
-30%

Original price was: $41.39.$28.97Current price is: $28.97.
-30%

Original price was: $16.99.$11.89Current price is: $11.89.
-30%
Original price was: $35.99.$25.19Current price is: $25.19.
-30%


Original price was: $49.99.$34.99Current price is: $34.99.
-30%
Original price was: $37.80.$26.46Current price is: $26.46.
-30%
Original price was: $26.23.$18.36Current price is: $18.36.
-30%
Original price was: $12.99.$9.09Current price is: $9.09.
ATXexas –
I installed these along the bottom edge of the lift-gate (back hatch) on my 4th gen 4runner. I ran the wire to the rear cargo light’s positive and negative. I simply wrapped the wires from this kit around little screws and screwed those into existing holes in the rear cargo light’s dome light fixture (see 2nd pic). Now these lights come on and fade when the dome light is set to ‘Door’, remain off when it’s in ‘Off’ and remain on when the factory switch is ‘On’.That way I didn’t have to drill any holes in my rig or install the switches that came with this. You can either route the wires along the bottom edge of the door and secure them with clear tape or you can drill into and out of the hatch panel. I ended up cutting and splicing all the wires so I’d not have any excess wire.That picture is in my driveway in the pitch black night. It looks like the truck is under a streetlight, lol. It’s so bright my wife said she’s concerned for anyone around us when we’re camping. Ha!
Joseph –
Good product and great value, quality material, lengths of wire that reach pretty far, pretty bright lights but… Literally everything is backwards if you follow the instructions or follow standard electrical practices when wiring it in. The wire marked hot is actually ground and the wire marked ground is actually hot. I couldn’t get them to turn on until I got the wild idea to just switching positive and negative. The switch with the line and circle indicating on/off is also backwards. The hookups on the switch for the two hot leads are interchangeable. Literally everything electrical is backwards lolI hooked them up on a Chevy Silverado into the rear running lights that way they only work when the key is on and don’t drain the battery. For anybody who wants to do this as well, most Chevy taillights running light hot wire is brown. May need to upgrade the fuse, but so far both sets of lights work fine.
Amazon Customer –
These lights are super bright so I give them a 5 star on brightness. You need to test the switch. The instructions are incorrect. Thats why it is getting a 4 star overall. They tell you to feed power on middle prong..that is incorrect for the switch provided and unsafe as it gives power to both other prongs (one at a time depending how switch is flipped). If you feed power to a side prongs it will give power to the middle. That is how I hooked mine up. NO ground to the switch. Only ground the lights somewhere to the body. I used the 12v red wire on my 2014 Silverado trailer light harness with a inline fuse. Don’t power it up without a inline fuse. Be safe and spend the 8 dollars on a fuse holder. The only items this kit comes with (I’m sure all kits are the same) is lights with their wire, and switch. You’ll need your own wire connectors (16-22gauge),wire stripper and crimper, 2 female plugs, inline fuse, wire strap for wherever you drill in the ground ends, and splice connector to your power source unless you run a wire all the way to your battery.
Bryant –
You’ll need to pair this with some adhesive wire clips, because there is a lot of wire between pods and on the terminal end. That being said, it has plenty of wire to route however you need. Mine didn’t include the switch as advertised, so I had to buy my own. They are plenty bright and look just like they came from the factory.
Josue Larios –
The media could not be loaded. These are totally worth the $15 or whatever it was to get these. Added some Velcro backing to the adhesive, and the lights stuck to the top of my carpet-lined camper shell. Wired everything up to a pressure switch, so the lights come on when I open the shell!My only only comment would be to include some instructions, and allow all the lights to be connected together into one harness. I was able to figure this out without instructions, but can’t say the same for the average Joe; also, having two separate light harnesses is irrelevant if they’re going to be wired together anyways.
Aaron –
I want to be clear that I like these lights. I really do. But this isn’t a custom-designed kit where you follow a few directions and everything works great. You’ll need to do a little planning with this, and probably more than a little troubleshooting before you’re done.The package comes with two sets of four lights. Each strand has ample lead wire, depending on the distance it needs to be run and it’s possible to disconnect some of the light units without cutting wire, thanks to inline connectors.. When possible, it may be better to tie your power into a closer electrical systems than a direct line to the battery, but even that’s what you need to do, you may well have enough additional wire to get there. I installed these on a 2021 Ford Ranger, which has a termination under the bed from the factory (this is actually intended for use with a Ford accessory that installs a power port in the bed), which I used this as my source of power. Of course, you’ll not want these to run continuously, so the kit includes two switches (SPDT), along with a bit of mounting hardware for the lights. Enough people have complained that no wiring instructions are given, so apparently, they started including them. Unfortunately, the diagram in mine was actually backward. The center pole on the switch is power input as indicated, but the “on” pole is on the “off” side of the switch, instead of the “on” side as indicated. Bottom line, get a simple multimeter, put it in continuity mode, and test the switch before you use it.Other than that, I’m pretty pleased. The 3M tape on the lights seems to be holding well, though I found I needed to apply a fair amount of pressure to ensure they held. The light is nicely bright and works great. I made a small wooden block with a hole the right size for the switch and used some double-sided tape to affix it to the corner of my bed. I made plenty of wiring mistakes and had to do a bit of troubleshooting (hint: check your fuses), but after several hours of toying around, this non-electrician managed to get the job done.
MB –
Dislike the limited instructions. This could be a problem if you don’t know a lot about electrical.Liked super bright and easy install, for myself
Calbo –
Great product for the price.